TRS-80 XRX Mod – The Cassette Gazette Page 7
The Cassette Gazette was a 1983 one issue advertising newsletter that was a joint production of Lemons Tech and KWIK Software. The Gazette described the products sold by the two companies, mixed in with operational advice and interesting facts about using cassettes with your TRS-80. It appears to have been written by Wayne Lemons, the founder of Lemons Tech. The Gazette is reproduced here page by page with permission from Wayne Lemons' family.
TRS-80 XRX Mod
We love our TRS-80’s, and will always be grateful to Tandy for providing us with this wonderful machine!
But nothing is perfect, and for good reasons the early Model I units earned a reputation for “dismal” cassette performance. The real problem was NOT the fault of the hardware, however. The CTR-80/80A (also its predecessor, the CTR-41) and the cassette port circuitry are excellent, and capable of far better than the 500 baud standard chosen by Radio Shack. Non-uniform head alignment and very poor quality ‘commercial' duplication of program tape contributed to the problem, but the most important fault was in the ROM… the coding that set the timing loops for tape loading was simply incorrect. Radio Shack corrected the timing in the ‘new' ROMs used in later machines, but they were not about to replace the ROMs in all the early units.
As an interim measure, the early CPUs were eligible for a free field change. This was a hardware attempt to correct a software (firmware) error, a dubious approach at best. Called by various names (XRX, X2X, “Cload,” “Easy Load,” et al), the modification uses the master CPU clock to open a timing ‘window,' letting a ‘bit' signal pass through the cassette port only when the 500 baud data bits are supposed to occur. The mod does improve the volume range somewhat, but it also completely blocks almost any data at higher than 500 baud.
The KWIK format 1000 baud signal is the only exception we know of… it zips right through the XRX. But to load the higher KWIK speeds (1500-3000 baud), the modification must be bypassed by a simple alteration. Yet this is no loss, since at any speed the LemonAid Loader is superior to the XRX.
The loading performance of newer units (those that prompt MEM SIZE?) is greatly improved. This, however, is because the ROM routines are corrected, not because the XRX is incorporated into the hardware. The new units do not need the modification, thus do not have to be altered to allow the higher KWIK speeds.
The Ultimate Debugger
Here’s the ultimate utility for programmers… load it in and then write your program… if it doesn’t work just type RAID!
Bypassing the XRX
Each CPU that has received the Radio Shack “XRX” modification should have a “dash one” (-1) added after the catalog number appearing on its serial sticker. (But it’s not always there, of course.) To allow high-baud taping the XRX can either be bypassed (restoring the original circuitry), or made switchable (in/out) by adding a DPDT switch.
- Completely disconnect all cables from the CPU and place it face-down on a padded surface, with the ‘back' side facing you. There should be six cross-slot screws visible on the bottom of the unit. (On some, one screw may be under a label.)
- One at a time, remove these screws. They are of three different lengths, so note which lengths go where… they must be reinstalled correctly.
- Holding the CPU by the ends so as to keep the upper and lower halves pressed together, turn it over and place it in the normal upright position. Carefully lift off the top half of the case and place it aside in a safe place.
- Inspect the exposed interior. Just above the BREAK key, you should find a small (one inch by one-and-a-half inch) PC board stuck to the main board with a foam pad; this is the XRX mod. (On some units, it’s just below the right shift key.)
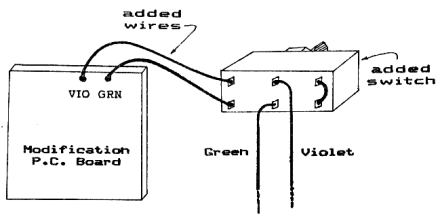
- Only two of the wired connected to the mod PC board are of concern, the Violet (V) and the Green (G). To bypass the mod, simply disconnect the V and G wired from the little PC board and connect them together. Exactly how you do this can depend on your technical expertise:
- The experienced technician can lift the keyboard, desolder the V and G wired for the main board, locate and bridge the cut trace.
- The CAUTIOUS type: cut the V and G wired where they enter the little PC board, strip some insulation from the ends of the wires, twist the bare ends together, then wrap the connection with tape. (Leave no bare wires!)
- OTHERS: unsolder the V and G wires from the mod PC board, connect, solder, and tape. NOTE: Leave all OTHER wires unchanged.
- The mod is now bypassed. Reassemble the CPU by carefully replacing the top half of the case, turning the unit over, and replacing the six screws exactly as they were originally.
Switching the mod in and out requires the mounting and wiring of a DPDT switch. Instead of step 5 above, the wires must be removed from the mod PC board and the switch connected as shown below:


